Every orthotist has faced that moment when a hinge plate refuses to sit right. Maybe the contour is off. Maybe the alignment feels slightly skewed even after a clean pull. Here’s the thing: forming hinge plates looks simple, yet tiny decisions shape the final device.
We break down what actually matters, why precision saves you from repeat adjustments, and how smart technique leads to stronger, cleaner, more predictable builds. You’ll walk away with clear methods you can apply to your next fabrication without slowing your workflow.
The Foundation That Makes Fabrication Easier
Before diving into technique, it helps to set the stage. Hinge plates behave well only when heat, pressure, and alignment work together. Even a small deviation changes how the joint transfers load. What this really means is that success depends on consistently forming habits.
When you use a structured workflow, you avoid warping, misalignment, and excess trimming. You also gain smoother motion for the patient and less rework for yourself.
Let’s break it down section by section, starting with the common challenges that every lab bumps into at some point.
Why Good Plate Contouring Shapes the Entire Build
You’ll see this early in any project: the shape of the plate influences the strength of the joint. If the contour drifts, the joint loses efficiency. That’s where the orthotic hinge plate forming steps into the process.
When you treat contouring as a single step rather than a sequence, you invite errors. The better approach uses staged heating, controlled bending, and gradual pressure to maintain the plate’s geometry. Many labs rush this stage because they want to save time, yet rushed forming creates more trimming, more noise in the joint, and more follow-ups later.
Another challenge comes from inconsistent heat. Too much heat softens the plate unevenly. Too little heat prevents clean shaping. A balanced mid-range temperature supports steady bending.
As you refine your method, you start seeing how every small move affects the final feel of the joint. With practice, the plate sits flush without force, and the joint performs as intended across the gait cycle.
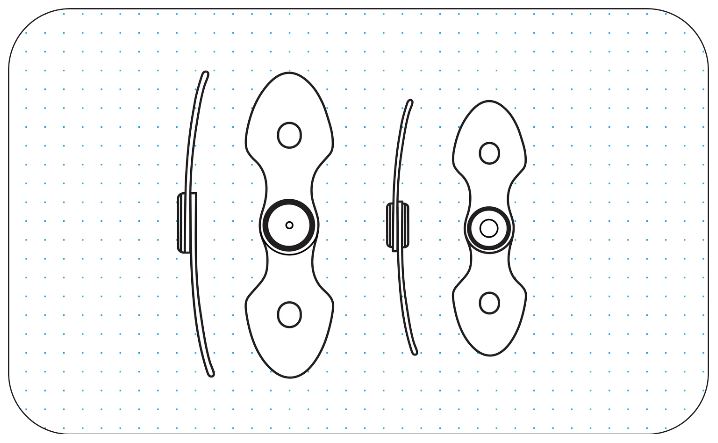
A Step-by-Step Look at Alignment During Fabrication
Top and bottom alignment determine how cleanly the joint tracks. Misalignment stresses the plate and shifts the patient’s biomechanics. That’s one reason orthotists pay close attention to sequencing. You start by marking the joint center and checking both sides against your reference lines. After that, you place the plate lightly, not fully set, so you can micro-adjust before committing.
Once the rough position looks good, you tighten your visual checks. Smooth motion without binding tells you the alignment is heading in the right direction. If you see drift, pause and adjust early. The more you refine here, the less you fight the device later.
You can also use a fabrication jig to keep the reference points fixed. It’s a simple trick, yet it keeps the joint symmetrical and stable across both shells.
During this stage, it helps to check spacing with the final padding layers in mind. Many orthotists forget that padding thickness alters joint clearance. When you visualize the final assembly now, you protect yourself from mismatches once you assemble the brace.
Comparing Plate Materials and Their Behavior
- The choice of plate material changes everything: flexibility, durability, heat response, and long-term motion quality. This is where labs often experiment.
- Some plates heat quickly but cool fast. Others need more patience but hold shape better.
- The goal is simple: pick the material that helps you get predictable results every time.
The comparison below helps clarify how each option behaves during forming and alignment.
Material Behavior and Fabrication Requirements
| Plate Material | Heat Response | Ease of Forming | Long-Term Stability | Best Use Case |
| Thermoplastic | Heats evenly and quickly | Easy to shape with moderate pressure | Moderate stability | General AFO builds |
| Composite | Requires careful, slower heating | Holds shape well but needs precision | High stability | High-activity or athletic use |
| Metal Hybrid | Slow heat absorption | Difficult but exact shaping | Very high stability | Heavy-duty or long-term bracing |
What this table shows is simple: each material rewards a different forming style.
When you adjust heat timing, pressure, and alignment technique to match the material, the entire process becomes easier. Over time, you learn to anticipate how the plate will behave before you even start working with it.
Techniques That Prevent Warping and Stress
Warping often happens when heat concentrates in one area. Rotating the plate during heating avoids this. Gentle, steady pressure keeps the plate clean and uniform. Here’s where the second use of orthotic hinge plate forming becomes important inside your workflow.
By warming the plate from both sides and shaping gradually, you reduce internal stress. You also control the bend radius more predictably, which helps the joint stay quiet and smooth.
Another smart habit is pre-checking mold edges. Sharp or uneven edges distort the plate as it cools. Smoothing these areas takes a few seconds, yet it solves many shaping issues. After forming, allow the plate to cool while supported. Free-cooling introduces a subtle warp that you may not notice until final assembly.
FAQ
-
How do I know if my hinge plate is heating correctly?
Check the color, texture, and feel of the material. It should soften evenly without glossy patches. Gloss often signals overheating. Test flexibility at the center before shaping the edges. With enough practice, you’ll recognize the right temperature instantly.
-
What causes alignment drift during fabrication?
Drift occurs when the plate shifts before final placement. Light pressure, incorrect reference lines, or uneven shell thickness can push the plate off-center. Slow down, confirm your marks, and adjust before committing.
-
Should I pre-trim the plate before forming?
Pre-trimming can help when working with thick edges, but don’t over-trim. Leave enough room for fine adjustments after forming. Most orthotists prefer shaping first, then trimming for precision.
-
How do I prevent the plate from cooling too fast?
Place it on a warm surface, or keep gentle heat nearby. Quick cooling often creates micro-warps. Supporting the plate as it cools stabilizes the final form.
-
Can I repair minor warping without starting over?
Yes. Controlled reheating can fix slight bends. Keep the heat light and focused. Too much heat resets the shape entirely, forcing you to reform it from the start.
The Final Words
Great hinge plates don’t happen by accident. They come from careful planning, steady technique, and an understanding of how materials behave under heat and pressure. When you treat orthotic hinge plate forming as a craft, you get smoother joints, cleaner alignment, and fewer follow-ups.
Every stage matters: heating, shaping, alignment, and cooling. Now is a good time to refine your approach and work with more confidence. If you want deeper guidance, explore extended fabrication guides or reach for expert assistance.
Let’s help you build devices that feel better, work better, and last longer!